
Cumulus Importer Version 6.6
EJaP (Embedded Java PlugIn) for the Canto Cumulus 6 Workgroup Edition or SingleUser (Mac OS X or Windows)
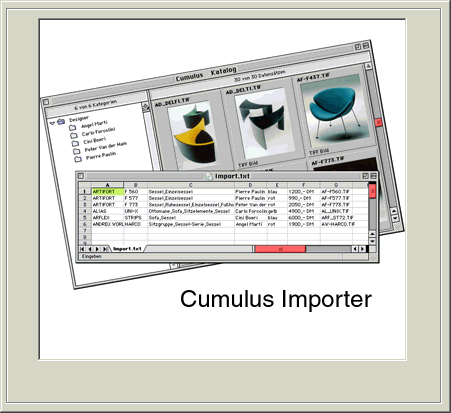
The Cumulus Importer enables you to import information from a text file into a Canto Cumulus catalog version 6 or higher (Remark: if you want to import data into a Cumulus catalog version 5.x, please use our Cumulus Importer 3.1). With the help of the software you can import information from any other database system, Excel spreadsheet or text list. The data should be exported from the database system in the standard database export format (database fields delimited by tabulator character). You can assign the information to each and every Cumulus field (record field or category field). The data can imported into text fields, string list fields or into the category list .
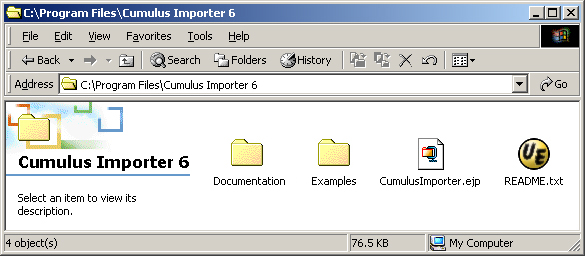
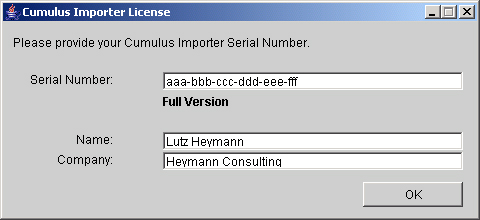
When you download the Cumulus Importer product from the web, you get the file 'CumulusImporter66.zip'. Unpack the file 'CumulusImporter66.zip' to get the folder 'Cumulus Importer 66'. If you get the product on CD-ROM, you will find the folder 'Cumulus Importer 66' in a sub directory named after your operating system ('Windows' or 'MacOSX'). Installation under Windows: copy the folder into the directory 'Program Files' on your system hard-disk ('C:\Program Files'). Installation under Mac OS X: copy the folder into the directory 'Programme' on your system hard-disk. If you want to use the examples shipped with the software, it is import to follow these copy instructions. The contents of the installation folder: To install the software under Windows, copy the folder 'Cumulus Importer 66' into the folder 'C:\Program Files'. The examples shipped with the software can only be used if you copy the folder (and all the contained files and sub-folders) to this destination! Under Mac OS X, copy the folder 'Cumulus Importer 66' into the directory 'Macintosh HD/Applications'. In the copied folder you will find the module 'CumulusImporter.ejp'. Copy this file into the 'ejp' folder in the installation folder of your Cumulus application (Cumulus Client or Single User). Under Windows it is 'C:\Program Files\Canto\Cumulus 6 Workgroup Client\ejp', under Mac OS X it is 'Macintosh HD/Applications/Cumulus 6 Workgroup Client'. The 'ejp' folder of the Cumulus application can be found in the Cumulus package. You can reach this folder by clicking the mouse-button while holding down the CTRL-key on the Cumulus application. Click on 'Show Package Contents' in the context-menu. This will open a finder-window with a subfolder 'Contents'. In that folder you will find a Mac OS X folder and there you will find the 'ejp' folder in which to copy the 'CumulusImporter.ejp' file. Restart the Cumulus application to use the Cumulus Importer, it will show a new menu item in your Cumulus application called 'Importer'. A full version of the product comes with a serial number, that you have to specify in the license dialog: The License Information will be saved in the local config folder of your Cumulus version. So if you want to use the Cumulus Importer on different computers, you have to specify your serial number on every computer before you can use all the functionality of the product. It is also possible that you have got a full version without a serial number (usually with an update to Cumulus Importer 6.6 that has already been included in a former version). In that case the serial number is already integrated into the product and it is not necessary to provide the number in the license dialog. You will be informed about this fact when the software is shipped.
The demo version of the software is a fully functional version of the 'Cumulus Importer', so you can use the demo version to test each and every functionality. The number of records that you can import with the demo version into a Cumulus catalog is limited to 5 records per session. You can order a full working version of the software here. The Cumulus Importer comes with a set of example files. To test the examples described in this readme file please use the Cumulus catalog 'furniture.ccf', which you can find in the folder 'Examples'. Additionally you will find two text files in the folder with data to import into the catalog. In the sub folder 'Import scheme files' you will find some examples for field assignments for importing data into a Cumulus catalog. The import scheme files hold assignment information and the path to the textfile. You can only use the import scheme file, if the path to the text file points to the standard installation path 'C:\Programms\Cumulus Importer'. Of course, you can change the path in the import scheme file with every text editor to use the import scheme with the text files in a different location.
To import information from a text file into a Cumulus catalog with the help of the Cumulus Importer, please do the following:
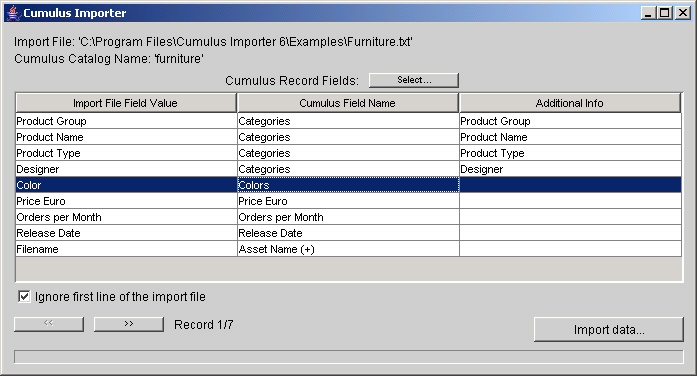
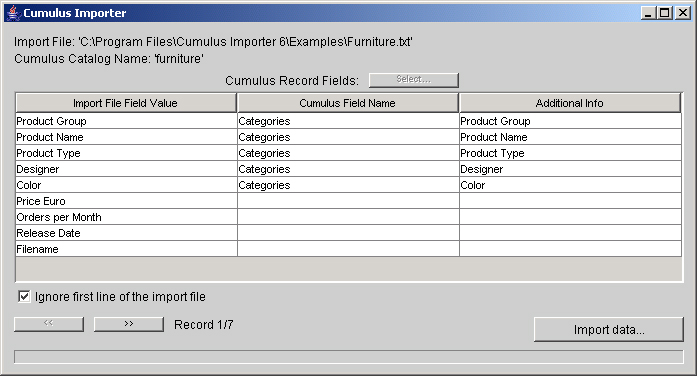
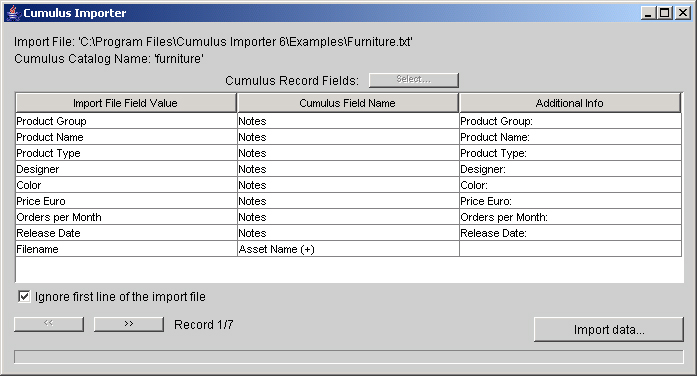
In the example above text information from the file 'Furniture.txt' is imported into the Cumulus catalog 'Furniture'. The text file contains information about different designer furniture products. Please select the text file, that contains the data that you want to import into your Cumulus catalog, by using the menu item 'Import>Open...'. The 'Cumulus Importer' displays the list of the first record of the text file in the first column of the table. The field values are separated by tabulator. The first line of the text file is: Product Group tabulator Product Name tabulator Product Type tabulator Designer tabulator Color tabulator Price Euro tabulator Orders per Month tabulator Release Date tabulator Filename A lot of database systems use the Tabulator as the field delimiter (even Cumulus while exporting data from a catalog). If your text file uses a Semicolon as the separator, you can change the setup in the options to let the Cumulus Importer work with this type of text file. Often the line of the text file does not contain information that you want to import in your catalog. You can disable the import of the data of the first line by activating the option 'Ignore first record of text file'. At the bottom of the dialog you will find the number of records in the text file. Remark: the number of records is always the number of lines in the text file, independant from your selection to ignore the first record or not. This example file only contains 6 lines of text that should be imported. You can step through the lines by clicking on the buttons << and >>. In this example the text line holds 9 different fields, delimited by the Tabulator character. You have to define a relation between a field of the text file and a field in the Cumulus catalog. The relation field is necessary to perform the search for the appropriate records. In our example, the text file holds the name of the file and we can use this information as the relation field for the data import. Select the 9th line of the list, which holds the file name and assign the Cumulus field 'Asset Name' by clicking on the button 'Select...'. After seleting the Cumulus field you will be asked if the field is a relation field or not. Your answer should be 'Yes' to let this assignment be a relation. While importing the data the Cumulus importer will perform a search for 'Asset Name' and import the data into the records found. If no record is found in Cumulus, a message will be added to the log file (depending on your preferences setup). The following information should be imported: Please select the line that you want to assign a Cumulus field to. Click on the button 'Select...'. You have to decide, if you want to import data into Cumulus record fields or category fields. In this example we want to import data into Cumulus record fields. Remark: the Cumulus category list is a virtual record field (and NOT a category field)! After selecting the field type, you can not change this setup anymore until you restart the application. The 'Cumulus Importer' would now import field 9 of the text file into the Cumulus record field 'Asset Name'. You can delete this assignment by selecting the appropriate line in the list and by clicking the Backspace or Delete key. In this case, we do not want to import field 9 into the field 'Asset Name', but the Cumulus Importer should use field 9 as a relation field between the text file and the database. After seleting 'Yes' the field name in the line is marked with a '+'-character which should indicate that the field is a reference field and is not imported into the catalog but used to find the right records. For the import of the categories, we select line 1 to 4 at once and click on the button 'Select...'. Please select the record field 'Categories' in the list of fields. The categories should get a master category to structure the category list. You can define the names of the master categories in the third column of the table: The additional information function is available for category import and for import into text fields. For text fields, the additional information is imported prior to the text from the field of the text file. For further details on this topic, please read and try Example 3. This import scheme is used and further explained in Example 4. When opening the Cumulus Field List dialog for the first time, the Cumulus Importer reads all the fields from the Cumulus catalog. If you change the field definition of the Cumulus catalog in the meantime, you can update the field list by closing the Import Window. With the help of the 'Cumulus Importer' you can also import data, that will not be imported into Cumulus record fields or category fields. In this case, you do not have to define a relation field. This is when you import data into the category list or into a string list field. You will find a detailed explaination of what to do in the Example 1 and Example 2. You can assign each field of the text file to the Cumulus record field 'Categories'. The newly created categories do not have to be assigned to records while they are imported. It is also possible to define master categories. If one field of the text file holds a lot of categories delimited by comma or blank, you can let the Cumulus Importer split the text before importing it as one category. You will find an example of the import into the category list in Example 2. With the Cumulus Importer it is also possible to import data into a string list field. It is not necessary that the newly created list entries are assigned to records. Entries will only be added to the list once and they are sorted alphabetically. You will find an example of the import into a string list field in Example 1. The 'Cumulus Importer' can also import data into category fields. The steps for the assignment of the import into the category fields is equal to what you have learned before. If you want to import data into category fields, you have to select the correct Cumulus field type first: Record Fields. If you want to import data into category fields, you have to define a relation between the data from the text file and the field 'Category Name'.
To explain the usage of the Cumulus Importer, the software comes with a set of example files. You will find the example files in the 'Examples' folder of your installation folder (usually 'C:\Program Files\Cumulus Importer 66\' on Windows or 'Macintosh HD/Applications/Cumulus Importer 66' on Mac OS X). Please open the Cumulus example catalog 'Furniture.ccf' that comes with the software. The catalog is also located in the 'Examples' folder. The catalog contains necessary fields and records for the examples. You will find a shortcut to the 'Examples' folder in the 'Programs' menu. The example catalog contains 4 additional record fields: In the subfolder 'Import scheme files' you will find predefined import schemes that make use of the text files and the Cumulus example catalog 'Furniture'. Remark: the import scheme file contains the path to the text file, so if you have installed the software into a different than the standard folder please make sure that you do change the path to the text file in the import scheme file before using it.
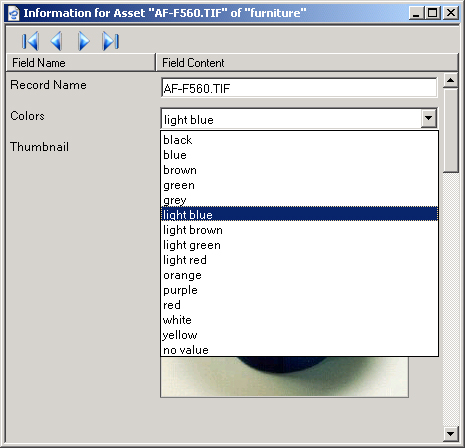
In this example a list of colors from a text file should be imported into a Cumulus string list field named 'Colors'. You will find the field assignments necessary for this example in the import scheme file 'Colors import scheme.txt' in the folder 'Import scheme files'. In the Cumulus example catalog named 'Furniture' you will already find a record field named 'Colors'. It is defined as a string list field. Please change your Cumulus Client or SingleUser setup, so the field is displayed in your information window. This is what you have to do to make the right assignments inside the Cumulus Importer to import the data (without the help of the import scheme file): After the data import the string list 'Colors' has the following contents:
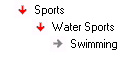
In this example, information from a text file should be imported into the Cumulus category list. The text file 'Furniture.txt' contains information about product groups, product names, product types, the name of the designer and the colors of the product. We want to have all this information as categories in the category list. You will find the field assignments necessary for this example in the import scheme file 'Categories import scheme.txt' in the folder 'Import scheme files'. This is what you have to do to make the right assignments inside the Cumulus Importer to import the data (without the help of the import scheme file): After importing the example data into the catalog 'Furniture' the category list looks like this: It is also possible to import complete hierarchical category structures. Therefor it is necessary to define a category level delimiter in the application preferences (Default: empty). If you import a category where the name contains the delimiter, the string is transformed into single words and a hierarchical structure is created with these categories. If you import a category like Sports/Water Sports/Swimming the created structure is like this: Remark: it is also possible to use this mechanism for creating addtional information to a category (which adds a master category usually). If the additional information contains the delimiter, a category structure is added as a master category for the imported category.
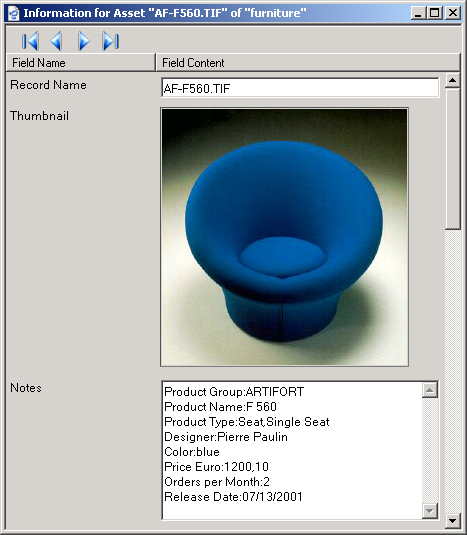
In this example a lot of information from the text file 'Furniture.txt' should be imported into the Cumulus text field named 'Notes'. You will find the field assignments necessary for this example in the import scheme file 'Notes import scheme.txt' in the folder 'Import scheme files'. In the Cumulus example catalog named 'Furniture' you will already find a record field named 'Notes'. It is defined as a text field. Please change your Cumulus Client or SingleUser setup, so the field is displayed in your information window. This is what you have to do to make the right assignments inside the Cumulus Importer to import the data (without the help of the import scheme file): After importing the data, the 'Notes' field of the catalog 'Furniture' has the following contents:
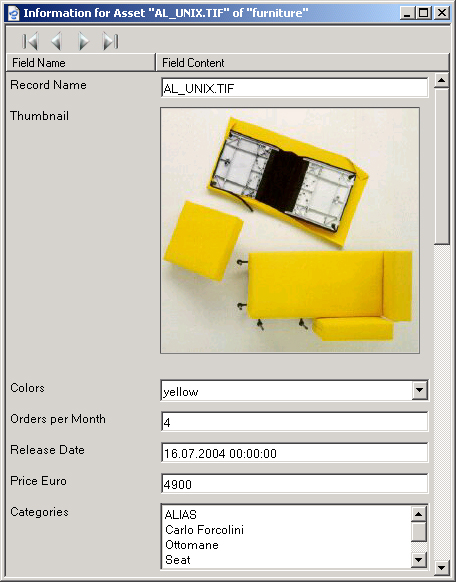
In this example, information from the text file 'Furniture.txt' should be imported into different Cumulus record fields in one step. You will find the field assignments necessary for this example in the import scheme file 'All fields import scheme.txt' in the folder 'Import scheme files'. This is what you have to do to make the right assignments inside the Cumulus Importer to import the data (without the help of the import scheme file): After importing the data, the catalog 'Furniture' has the following contents: It is also possible to import complete hierarchical category structures. Therefor it is necessary to define a category level delimiter in the application preferences (Default: /). If you import a category where the name contains the delimiter, the string is transformed into single words and a hierarchical structure is created with these categories. If you import a category like Sports/Water Sports/Swimming the created structure is like this: Remark: it is also possible to use this mechanism for creating addtional information to a category (which adds a master category usually). If the additional information contains the delimiter, a category structure is added as a master category for the imported category.
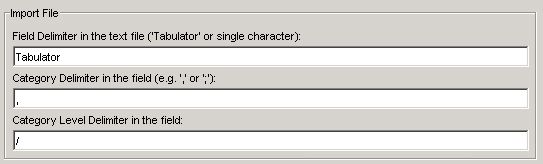
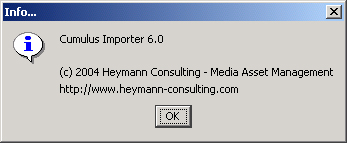
Open the text file, which holds the informationen that you want to import into a Cumulus catalog. You can open an import scheme file, which holds information about the text file, the Cumulus catalog and the field assignments. After loading an import scheme file you can immediately start importing the data into the Cumulus catalog. You can save all your preferences including the field assignments, name and path of the text file, the name of the Cumulus catalog and all the application preferences into an import scheme file. You will be asked to specify the name of the file. You can save it in each and every folder, but we recommend to save the file in the 'Import scheme files' folder. The info dialog displays the current version and registration information of your Cumulus Importer application. The field delimiter separates the fields in the text file. You can specify 'Tabulator' or a single character as the delimiter. The commonly used field delimiter is 'Tabulator'. The category delimiter seperates words in a field of the text file. If you want to import the words as single categories and they are delimited e.g. by Comma or Space, the Cumulus Importer will split the text of the field before creating new categories. The delimiter is a single character. With the help of this parameter you can create hierarchical category lists: Category Level Delimiter: / Category name to import: Sports/Water Sports/Swimming If you have defined '/' as the category level, this example category will be imported like this: 'Sports' will be created as a master category and 'Water Sports' will be imported as its sub category. 'Swimming' will be imported as a sub category to 'Water Sports'. Remark: the same mechanism is used while defining additional information to categories. If the additional information contains the category level delimiter, a hierarchical category structure will be created instead of just one category with the given name. When importing data into a text field, the Cumulus Importer can overwrite the contents of the field or add the text to the contents. Select 'Overwrite', if the new text shall replace the text in the field of the record or category. Select 'Append', if the new text shall be appended to the text in the field of the record. The Cumulus Importer performs a search for all the records or categories that match the defined relation between the catalog and the text file. In this option you can define if the data shall be imported into the first found record/category or into all found records/categories. Select 'First Record only', if you want the data to be imported only into the first found record. Select 'All records', if you want the data to be imported into all found records. If you select this option, all error messages are saved in a log file. This option should always be active. If you select this option, all common messages are saved in a log file. The common messages might give you more information in case the data is not imported as expected.
Version 6.6 - November 2005 Official release of the Cumulus Importer for Canto Cumulus 6.6. The software comes with a new licensing mechanism and log file improvements. The following changes have been implemented: - support the Java Classes of Canto Cumulus 6.6 Workgroup Edition, Single User and MediaDex Version 6.0.4 - August 2005 The version 6.0.4 has been changed to support Cumulus 6.6. Due to an error in the Canto Java Classes, the version 6.0.3 of the Cumulus Importer can not be used with the Cumulus 6.6 version. The Importer now uses a Windows-specific linebreak in the log file and does not trim the additional information anymore. Version 6.0.3 In version 6.0.3 the log file gives information about all search criteria that did not find any records. The log file also provides information about the line number of the import file if a valid search query could not be generated out of the import data. A problem has been fixed with 'dirty' import files. The application hang when the number of columns in a line of the import file was higher than the specified number of columns in the fields assignment. Now Cr Lf (Carriage Return Linefeed) is replaced by it Unicode equivalent. Version 6.0.2 The version 6.0.2 fixes a bug that occured when importing category hierarchies into the category list. With this new version you can import in 'Date Only' fields also. Version 6.0.1 The version 6.0.1 adds a new function to assign category hierarchies to Cumulus records. The lowest category name in the hierarchy will be assigned to the record. The category names in the category hierarchy of your import file has to be delimited by the 'Category Level Delimiter' defined in the preferences of your Cumulus Importer. The new product comes with a new set of product IDs provided by Canto. The new product IDs start with 11202-... . If you have received older product IDs with your Cumulus Importer (11200-...) you can get a new product ID from us for free. Version 6.0 The version 6.0 is the first version of the Cumulus Importer for Canto Cumulus 6. This implementation of the Cumulus Importer is based on the EJaP (Embedded Java PlugIn) Technology introduced by Canto with version 6 of Cumulus. The first versions of the Cumulus Importer (1.0, 2.0 and 2.5) have been released for MacOS (Technology: AppleScript) and version 3.x for Windows. Version 3.1 is the current version to use to import data into a Cumulus 5.x catalog.
If you have any further questions or problems with the software, please send an email to support@heymann-consulting.de. If you have any problems to define the right assignments for your specific needs, please send an example file so we can help you define the field assignments for the Cumulus Importer. We hope our product will increase your productivity in your workflow. FAQ 1: Why is importing metadata into some catalogs so extremely slow? Maybe you try to import metadata into a Cumulus Catalog that has not been created inside your network or the asset references in the catalog are not correct or point to servers that are unavailable. Due to a bug in Cumulus that first came up in Cumulus version 2.5 (!) (first AppleScript implementation of scriptability), Cumulus tries to resolve the asset references when metadata is saved in the record by scripting (although this is not necessary). If servers or network zones are missing, Cumulus will try to find them, anyway, and depending on the routing in your network, this might even cause a search on the internet. Of course, this takes 'ages'. Solution/Workaround: You can switch off the AssetStore modules causing the trouble before importing the metadata. You have to 'Deactivate' the AssetStore modules for Mac OS (Mac OS File System) and Windows (Windows File System) under 'Preferences>Asset Handling Sets' for the Asset Handling Set that is used (usually 'Standard'). The UNIX AssetStore does not cause the problem, so you can leave this active. Please 'Activate' the AssetStore modules after the metadata import. FAQ 2: Why are the categories not created during import of metadata into records? The import of categories into the category list and adding these categories to records is a two step task in Cumulus Importer. First, you have to create the categories by importing metadata into the 'Categories' (record) field. After creating the categories, you can assign these categories to the records in a second import task. You can find an example on how to create categories with the Cumulus Importer in Chapter 5.3.2 Example 2: Import into the Category List. After creating the categories, you can assign them to records as it is shown in Chapter 5.3.4 Example 4: Import into the Record Fields.
© 2001-2005 Heymann Consulting, Media Asset Management Brandstwiete 36, 20457 Hamburg
Contents
1. Introduction
2. Installation
3. Demoversion
4. Usage
Important: before you can import information into a Cumulus catalog with the help of the 'Cumulus Importer' you have to make a safety copy of the catalog before you can go ahead and change the meta data in the catalog. There is not UNDO function for the import available. You can only go back to the initial version of the catalog if there is safety copy available that you can open instead of the changed catalog.

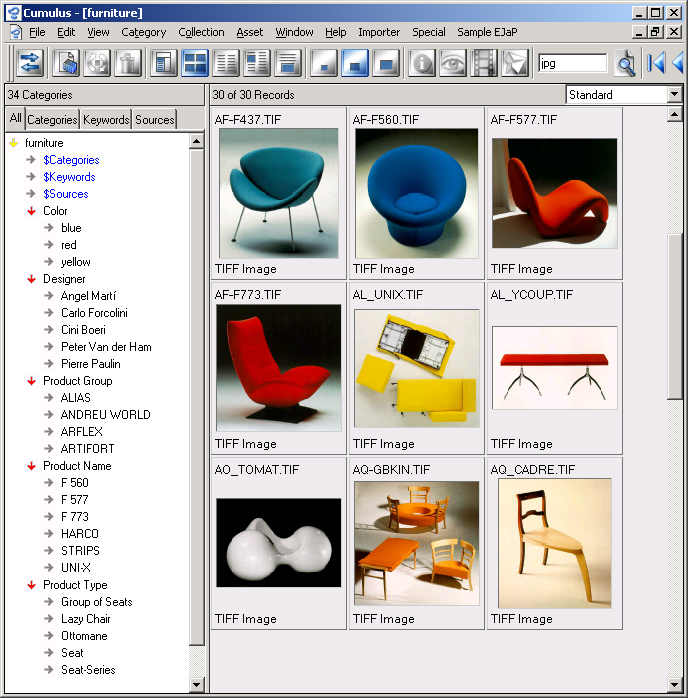
The Cumulus 6 example catalog before the import of data
There are 3 different types of imports available with the 'Cumulus Importers':
- Import into the category list or string list fields
- Import into record fields
- Import into category fields
The import of data into a string list field is very simple to do, you only have to select the field of the text file and the Cumulus string list field and start the import of data.
If you want to import data into a record field of the Cumulus catalog, you have to define a relation between the text file and the Cumulus catalog by specifying one or more relation fields (in most cases the 'Asset Name', if this criteria is unique!). The Cumulus Importer will only import the data into a record, if the value of the relation field is equal to the value in the field of the text file. Depending on the preferences the information is imported into the first found record or in all found records.
Example:
The text file that you want to import contains the name of the file together with other information. In the 'Cumulus Importer' you define a relation between this field of the text file and the Cumulus field 'Asset Name'. When importing the data Cumulus performs a search for all the records with this file name in the field 'Asset Name'. If available, the information of the record of the text file is imported into the first found record or all found records, depending on your preferences.
If you want to import information into category fields of the Cumulus catalog, you have to define a relation between a category field and the field of the text file. The procedure is identical to the procedure necessary when importing information into record fields.
Example:
The text file that you want to import contains the name of the category together with other information. In the 'Cumulus Importer' you define a relation between this field of the text file and the Cumulus category field 'Category Name'. The Cumulus Import browses the category list and assigns the information to the fields of the first found category.
If you want to import information into a text field or category, you can define additional information that is imported prior to the text that comes from the text file or as a master category to the newly created categories.
Example 1 - Master categories:
A list of product names shall be imported into the category list. Newly created categories are sorted alphabetically on the top level of the category list. In most case it is much better to create a master category for categories 'of the same type'.
Example 2 - Additional Text:
If you do import a lot of different data into the same text field it is helpful to define additional text that is imported prior to the information from the text file. E.g. if you want to import the price of a product into the notes field, you can define additional information like 'Price Euro:' that is added to the text before importing it into the Cumulus catalog. After the import the notes field looks like this:
Price Euro: 4711
The additional information increases the readability of information in a text field.
A log file will be created that can give you more information about the success of the import. You can specify the name and location of the file.
5. Configuration of Import of Data
5.1 Field assignment for the import of data
An example configuration for the import of data: information is added to the records and new categories are created and assigned to the records.
Import preferences for the data of the example file 'furniture.txt'
![]()
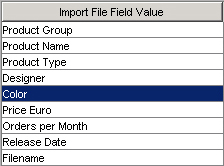
The display of the first record of the text file in the list of fields
![]()
With this setup the first line of the text file is ignored
![]()
In this example the first of 7 records (lines of the text file) is displayed
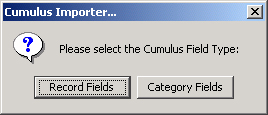
Selection of the Cumulus field type: Record field or category field
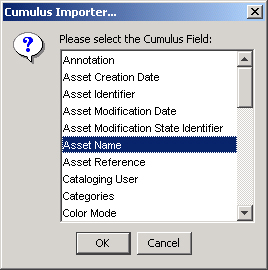
Select a record field out of the displayed list of fields

![]()
The additional information for a category is used to create a master category
5.2 Further Information about the Configuration
5.2.1 Update of the Cumulus Field List
You can update your Cumulus field list by opening a new import window
5.2.2 Import of Data without Record Field Entries
5.2.2.1 Import of Data into the Category List
5.2.2.2 Import of Data into a String List
5.3 Import of Data into Category Fields
5.3.1 Import of Data into Category Fields
Selection of the Cumulus field type: record fields or category fields
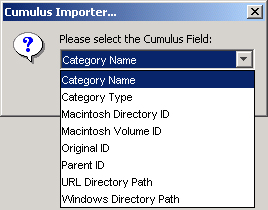
Select a category field out of the list to specify the relation to import into category fields
5.3 Import of Data - Examples
Before the import of data the example catalogue contains no categories and neither the additional fields are filled
5.3.1 Example 1: Import into a String List Field

On the left hand side, 'red' is displayed as the first line of the text file. Double-click on 'red' (or use the 'Select...' button) to assign the text to a Cumulus field. You have to decide, if you want to import data into a Cumulus record field or a category field. The field 'Colors' is a record field so you have to select 'Record Field' as the field type.
List entries will be sorted alphabetically
5.3.2 Example 2: Import into the Category List
5.3.3 Example 3: Import into Record Fields (Notes Field)
The additional information will be inserted in the notes field ahead of the imported text
5.3.4 Example 4: Import into Record Fields
The categories have been created as sub categories of the defined master categories
The informationen and categories have been assigned to the Cumulus records
6. Menu Items
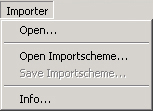
Open...
Open Import Scheme...
Save Import Scheme...
Info...
7. Application Preferences
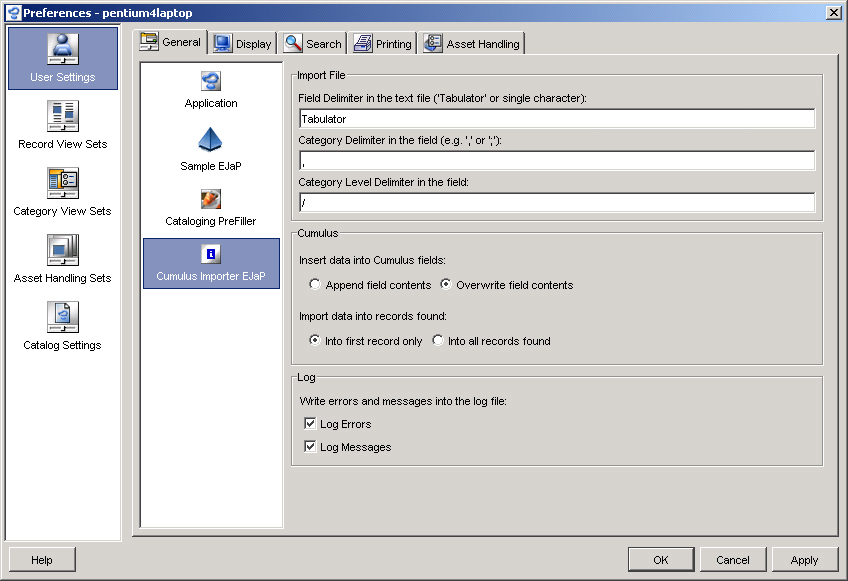
7.1 Import File Preferences
The preferences for the text import file
Field Delimiter
Category Delimiter
Category Level Delimiter
7.2 Cumulus Preferences

The preferences for the Canto Cumulus records
Keep/Overwrite Record Field Contents
Import into the first record/all records found
7.3 Log File Preferences

The preferences for the log file
Log Errors
Log Messages
8. Version History
- lists of hierarchical categories can now be importer into records in one step (e.g. 'cat1/subcat1/subcat12,cat1/subcat2/subcat22,cat1/subcat3/subcat1')
- a new license mechanism (license dialog) has been implemented. The new serial numbera are not Cumulus Option numbers anymore, so it is not necessary anymore to get a new Cumulus Activation Key after installing the Cumulus Importer.
- an optimized progress bar now shows the current line number of the import file at run time
- an optimized log file now informs about the preferences used to import the metadata
9. Further Information and Support
9.1 Frequently Asked Questions
info@heymann-consulting.de, http://www.heymann-consulting.de